The old yahoo group was ported over to groups.io SunfishSailor about a year ago. The files are located at
Log In
Good luck!
Log In
Good luck!
Follow along with the video below to see how to install our site as a web app on your home screen.

Note: This feature currently requires accessing the site using the built-in Safari browser.


Ask and you shall receive. BTW, I posted these on the old Yahoo forum rip.


After I make the flat piece of fiberglass and let it dry, slide it in with a layer of epoxy on back side of what is left of my transom to stick it against? Maybe wedge some plastic bags in to keep the pressure? I agree I would like to make it stout. So I am guessing your gudgeon did not survive against the dock?You can buy (or make) a panel of fiberglass. ("Make" on a flat piece of plastic, which will release the panel once it's cured).
I'd make it somewhat oversized, and seal it to the inside. Build up layers on the outside to make it fair to the rest of the transom.
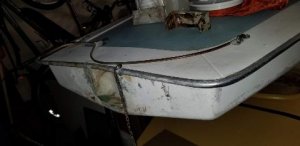
When launching bow-first into water, my friends pushed me and my Sunfish off the dock, not mindful that my weight (plus the boat) were going to hit the dock on the gudgeon.
So I tend to make things stronger than they need to be—and mucho fiberglass adds a very small penalty in weight.
Please post pictures of the boats, it helps generate suggestions for repairs and we like seeing the photos.
First, Brian thanks for posting that info long ago and for sharing it again today. There is still some traffic on the new group, and all of the old FIles, Photoa and Messages are there, we ported them over last year. Wayne passed the Group to Keith who passed it along to us, so if anyone is looking for something do a search there as well as here or ask us, you friendly Maritime Librarians.
2. Henny G let's see a photo of your boat, first thing to do is to do iw weigh it, do an air leak test and then a good bath to assess condition. The hull should weigh approx 140 pounds.
3. BrainC I wouldn't worry about the foam, the small amount removed for a deck plate is not significant, plus installation of the plate will help stiffen the area. We use 6 inch plates amidships and 5 inch aft due to differences in deck camber.
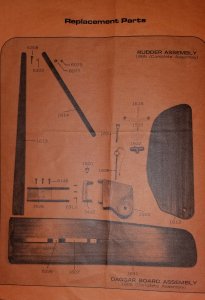
Scorpions are Clonefish, the only boat we ever took to nautical Valhalla was a Scorpion, someone had "repaired" fiberglass damage on the bottom by pouring polyester resin all over the hull, it looked like pancake syrup, weighed a ton. We liberated the rig, trim, rudder etc...and put them on a 1971 restoration named SASSY.
Most Sunfish parts will ship over to Scorpions, and rudders convert also.
")
I used exactly the same tool (except it didn't say Warner and doesnt have the little tear drop in the middle), on my third attempt. Unfortunately it wouldn't budge. I am going to try to let the corrosion oil set in and then I will try again.If you have one of these painting tools, they work really well in opening the drain plug. The flat section opposite from the point fits in the grove and you get great leverage when turning the plug. I couldn't get my drain plug open for years and I tried everything. This worked the first try.
View attachment 45472

Awesome post, so many options! I do like the idea of not having a port. The boat has stayed pretty dry. Also, less carving necessary into the foam beams. So, I am thinking now about building the fiberglass patch and backing plate sandwich oversized to fill the entire hole. Using the existing threads in the backer plate and some new stainless bolts to slip in the assembly in place and hold it while it cures against the hole. Once it drys build it up from the outside.There are several ways to fix those holes, I'd also put in and internal patch first, to repair the transom and cover up that drain hole.
In no particular order Option one is a Blind Hole Patch, no inspection port required. You could leave a small opening in the middle of it to insert you gudgeon backer or build a backer into the patch, I know you're thinking screws and nuts but the latest Sunfish use self threading marine stainless into an aluminum backer.
View attachment 45473
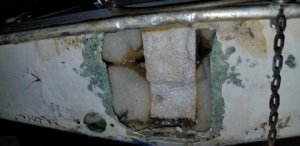
Option two is to split the hull/deck seam and pop open the trunk, that's how the factory would have repaired them. The reseal the area like no one was ever there. You could scoop out excess adhesive foam that is in there. Always always always leave the white blocks with a small amount of adhesive attaching them.
View attachment 45474
Option 3 is the deck plate and there are a lot of benefits to that. Most backing plates were held in place with what we call a fiberglass strap, and as you mentioned the gudgeon plate on a Sunfish was pretty much encapsulated. There is no need for a backer plate larger than the gudgeon plate unless you plan to dock launch like L&VW
Patch from the inside first, then build up layers of fiberglass, we use 4 oz strips, inside the void where the transom piece used to be. Leave the repair just a little shallow so you can fair and paint/gel coat.
You could epoxy the plate into place without the fiberglass cloth. Actually if you have an inspection port there is no need to permanently attach the plate if you put the port in a spot where you can reach the plate.
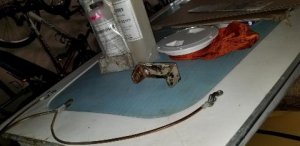
Well, there's one port!Nice pictures. Here is the picture of my boat in need of gudgeon repair.
")
While you'd be correct to position the open drain down, I perceive one or two ports in your future.I am glad I am digging here. I just purchased a scorpion I realized though it seems intact it weighs 250 lbs and is full of water.
I am hoping mine also has the drain hole on the starboard side. With the amount of water in it I am not sure if it can ever dry out without placing a few inspection ports. I will start with opening the drain and doing some positioning.
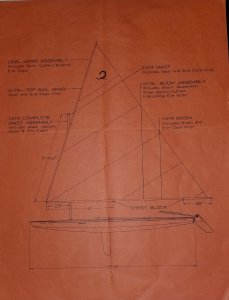
I have yet to open up the sail and see what I got myself into. Thanks for posting the schematics, I couldn't figure out how to get them out of the yahoo archive.

While you'd be correct to position the open drain down, I perceive one or two ports in your future.
(The drain is intended to drain natural condensation--a soaked interior would "weep" indefinitely).
The drying of a saturated hull will take weeks (or months): Whatever yellow-pillowy "factory" foam you can remove by hand will speed up the process. Leave intact whatever is directly above or below the structural white foam.
Dry-out can be active (fans, heat, ducts) or passive (inverted outdoors in the sun, covered with black plastic). Check progress by weight. There is a "curve" which tapers off as the yellow foam dries out.
Assuming you mean to repair the crack?I also found a crack in the cockpit on the side, just past a missing rivet. Am I going to be able to repair that without removing all the other rivets and getting underneath?
I've drilled new holes, and added rivets even without a grip for appearance' sake.