Navigation
Install the app
How to install the app on iOS
Follow along with the video below to see how to install our site as a web app on your home screen.

Note: This feature currently requires accessing the site using the built-in Safari browser.
More options
You are using an out of date browser. It may not display this or other websites correctly.
You should upgrade or use an alternative browser.
You should upgrade or use an alternative browser.
Mast step broken: is it repairable?
- Thread starter CDWells
- Start date
Tops
Mildly Thixotropic
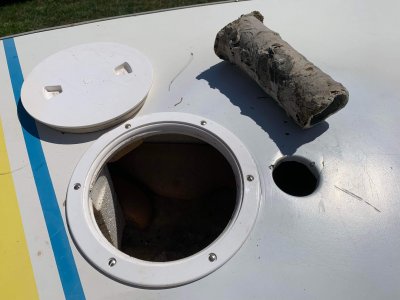
Here are some pictures inside one of my hulls (the only one with access holes, foam is removed), hoping it helps for ideas and stimulating conversation.


Tops
Mildly Thixotropic
You are welcome. Here is a link to some factory tour photos that show some as-being-built pictures.Thank you. Yes, it helps to see what’s inside. I haven’t seen the boat in person but I know they have a couple hull access ports in the bow section already; yes, a couple.
Laser Performance Factory Tour Photos
I suggest you search the Laser/ILCA forum with mast step repair (or something similar) in the search box. There are many reports on that side of the 'aisle' because failure of a mast step is not uncommon on a Laser/ILCA.
Perhaps you will need to fabricate a new mast step and install it.
Perhaps you will need to fabricate a new mast step and install it.
L&VW
Well-Known Member
In my search for a better way to re-attach the halyard cleat, I saber-sawed through a lot of wood bonded near the mast. Not satisfied with that repair, I'm going to add a mast cleat.
The new mast step will have to be built up. I'd use several layers of newspapers around the mast. Make a tube of several layers of 8-oz fiberglass cloth "tape". Make it somewhat oversized and trim to fit. Reinforce the top and bottom with more fiberglass.
The new mast step will have to be built up. I'd use several layers of newspapers around the mast. Make a tube of several layers of 8-oz fiberglass cloth "tape". Make it somewhat oversized and trim to fit. Reinforce the top and bottom with more fiberglass.
Tops
Mildly Thixotropic
In my search for a better way to re-attach the halyard cleat, I saber-sawed through a lot of wood bonded near the mast. Not satisfied with that repair, I'm going to add a mast cleat.
The new mast step will have to be built up. I'd use several layers of newspapers around the mast. Make a tube of several layers of 8-oz fiberglass cloth "tape". Make it somewhat oversized and trim to fit. Reinforce the top and bottom with more fiberglass.
L&VW, are you going to fit the new tube/step like the factory (around the molded lip in the deck) or do something different?
CDWells, did the owner send you any more pics?
You'll need to fiberglass the tube back into place. Clean everything up, the tube and the fiberglass mating surfaces inside the boat. Use 6 0z fiberglass strips and your adhesive of choice to attach the top and bottom of the tube back to the deck and hull. We like THIXO thickened epoxy adhesive and others like a polyester resin thickened. Either will work.
If you have a tube, we'd use fiberglass woven roving, but a lot of layers of cloth would also work.
If you have a tube, we'd use fiberglass woven roving, but a lot of layers of cloth would also work.
L&VW
Well-Known Member
I left the mast step in place, drilled two deep ¼" holes diagonally down through the mast step, and epoxied six-inch portions of fiberglass "tickle sticks" to connect the tube with the deck wood I'd unwittingly sawed through.L&VW, are you going to fit the new tube/step like the factory (around the molded lip in the deck) or do something different?
CDWells, did the owner send you any more pics?
 :
:("Tickle sticks" are 30" fiberglass ¼"Ø rods used to coax Florida/Bahamas lobsters from their hiding places).
Then used THIXO to bond the rest, epoxying everything back together.
Last edited:
I actually picked up the hull today and hope to repair it over the winter. Reading all the comments and seeing photos here has encouraged me to take on this projectL&VW, are you going to fit the new tube/step like the factory (around the molded lip in the deck) or do something different?
CDWells, did the owner send you any more pics?
L&VW
Well-Known Member
See above. I didn't touch the mast step, as I only wanted the halyard cleat and halyard block to be supported by nuts and bolts. (and not screws). It was too much work, so I don't recommend this approach.L&VW, are you going to fit the new tube/step like the factory (around the molded lip in the deck) or do something different?
Before I put it all back together, here's a picture putting the camera face-up--resting (inside) on the keel:
The thick part at the top surrounds the mast step, which I can't make out in this picture.
Last edited:
Alan S. Glos
Well-Known Member
Mast step failures are more common in the Laser class and somebody used to market a repair kit composed of a new tube and rather large section of deck that could be glassed into the damaged area. I have seen a few of these repair jobs and they looked like overkill, but at least they got the boat back on the water. I suppose one could find another damaged-beyond-repair Sunfish hull and saw out a section of deck with the mast tube attached and fiberglass or epoxy the "donor" assembly into the "recipient" hulls deck and keel. The question is whether or not it makes sense to make the repair or just buy a Sunfish "hull only" for $150 and transfer the rig from the damaged hull to the "new" hull. To be candid, I am not sure I would ever trust a repaired Sunfish mast step in heavy air again.
To continue the quasi-medical approach, here is a piece I posted several years ago that Forum regular Tag reposterd on his blog. Warning: It is not for the squeamish: sunfish hull autopsy
Alan Glos
Cazenovia, NY
To continue the quasi-medical approach, here is a piece I posted several years ago that Forum regular Tag reposterd on his blog. Warning: It is not for the squeamish: sunfish hull autopsy
Alan Glos
Cazenovia, NY
Tops
Mildly Thixotropic
Has anyone considered or done a repair where an actual 'step' for the lower portion of the mast tube is fashioned?
The 'bigger the blob, the better the job' technique in the bilge seems in sharp contrast to the neat concentric tube and flange arrangement on the deck.
The 'bigger the blob, the better the job' technique in the bilge seems in sharp contrast to the neat concentric tube and flange arrangement on the deck.
Nicholson58
I’d Rather Be Sailing My Tornado
Check on line. There are sources for wound glass tubes. Yours looks pretty raw. Try McMaster Carr. Try US Composites where you can get 635THIN Epoxy and a wide variety of glass, carbon fiber, fillers and other reinforcements. Your big port should give plenty of access. A Fine multi tool or equivalent will help with prep.
Thank you. There was a previous repair attempt. Lots of epoxy or other glue both on the original fiberglass tube as well as on the hull “socket” and under the deck. I like the idea of using a multi tool to clean up the hull and deck. The large portal will certainly help. I’ll likely try to clean up the original mast tube as well. I think I can build up fiberglass cones around both ends of the tube to reattach and reinforce it at the top and bottom.