Home stretch!

Mama H Chicago

Mother of sailboats
At what point do I stop really refinishing a boat and cross into building a new boat??? Red Rubber Duck (now re-dubbed “Woodie” has now had both her deck and hull complexly removed. It’s a terrifying sight seeing her skeleton in my garage…not much of a boat at the moment! But alas, I have her deck, both sides of her hull, her keel, all ready to be attached as new marine mahogany ply and oak for the keel and such.
IMG_9385.jpeg

My thumb was a casualty today, but no big deal.

Part of me really wants to make templates of every piece and make one of these for myself :)IMG_9389.jpeg

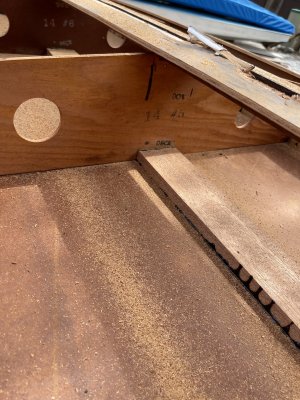
I had a heck of a time freeing the mast step. Ended up burning out a Ryobi Multitool, replaced it with a more expensive beefier brushless one with Diablo blade, and ended up slicing off the mast step right through the carriage bolts.

Had to get creative with those, as there was no way with PB Blaster, 4D40 etc that they were going to unscrew.
IMG_9371.jpeg

I can’t seem to add a video, but I ended up hammering a mail in from the bottom up, to start pushing to bolt out.
IMG_9373.jpeg
71097116604__1AB0E128-792F-4DF8-A7F4-F650BF252086.jpeg
 

Attachments

  • IMG_9386.jpeg
    IMG_9386.jpeg
    1.2 MB · Views: 48
Wow, she's looking very light and swift! Nice work on the deconstruction. And we like the word complexly.

Building a boat is easier and faster. You are unbuilding and then rebuilding. 3 times the work by our estimation.

We enjoyed looking at the thoughtful details inside, like the limber notches cut on the frames. Keep in mind that there is a small gap between the frames and the deck and hull, so water can flow. IOW avoid the temptation to put adhesive along the edges of the frames. We did add a coat of thickened epoxy to the inside seams of the mast step and daggerboard trunks, to reduce water intrusion. That wood will swell a bit but it also has shrunk a bit over time.

What numbering are you seeing inside?

And was there a stern drain?
There is a stern drain. What do you mean by numbering inside? She’s got the kit numbering of the parts, along with I think a “14” appended to each. Complexly was a typo, but oh so appropriate! I’m medically challenged via cardiology challenges but I wish I had recorded my technique for freeing the deck. My youngest child let me know that the hammer blows to break free the 80 year old sealant from the XXXXXX (insert name of that flat piece of wood down the centerline) was able to be heard a full block away on her dog walking trip. That worked so much better than my hull removal where I used a circular saw to cut away most of the plywood and then a prybar to clear remnants.
 
Wow, she's looking very light and swift! Nice work on the deconstruction. And we like the word complexly.

Building a boat is easier and faster. You are unbuilding and then rebuilding. 3 times the work by our estimation.

We enjoyed looking at the thoughtful details inside, like the limber notches cut on the frames. Keep in mind that there is a small gap between the frames and the deck and hull, so water can flow. IOW avoid the temptation to put adhesive along the edges of the frames. We did add a coat of thickened epoxy to the inside seams of the mast step and daggerboard trunks, to reduce water intrusion. That wood will swell a bit but it also has shrunk a bit over time.

What numbering are you seeing inside?

And was there a stern drain?
PS… I really am planning on building one of these fresh, from scratch. I’m taking exacting measurements and my plan is to follow the original Kit instructions, updated to reference modern common use tools instead of hand drills. I’d be happy to share my “kit”.
 
We were referring to the kit numbers on the frames.

Centerline is referred to as deck longeron and keel longeron. The tiny stem for the bow is one of out favorite parts, wonder who got to make those at the factory?

One of our friends worked at Alcort in the 50s, first sanding the wood parts then promoted to cutting out masts and the like, He said one of the first things he did was send a mast blank through a planer with the template still attached, which sawed up the template. There were conversations afterwards, one way type.
 
I’m en route to Connecticut right now, flying back to Chicago this evening. I’ll send some pics. The tiny stem for the bow…. Do you mean this?
IMG_8849.jpeg


This is my favorite part too!
 
We were referring to the kit numbers on the frames.

Centerline is referred to as deck longeron and keel longeron. The tiny stem for the bow is one of out favorite parts, wonder who got to make those at the factory?

One of our friends worked at Alcort in the 50s, first sanding the wood parts then promoted to cutting out masts and the like, He said one of the first things he did was send a mast blank through a planer with the template still attached, which sawed up the template. There were conversations afterwards, one way type.
Anecdotally, I’ve heard that the wooden masts snapped like toothpicks, and Alcort would send a replacement aluminum mast. The one I’ve got is tapered and the mast cap at top appears to be aluminum as well? I’m learning about Jen Weld to repair it as the hole is ripped through. I’d go with a new plastic cap, but they don’t fit!

What I find really interesting about these early tapered masts is that as I’m polishing it up, there are ring marks evenly spaced along the entire length. I don’t get the sense that they were caused by sail rings, as they only are showing up when I’ve polished off oxidation. Might your friend from early Alcort have any insights into this? Again, I will post pics once I return to Chicago.
 
We were referring to the kit numbers on the frames.

Centerline is referred to as deck longeron and keel longeron. The tiny stem for the bow is one of out favorite parts, wonder who got to make those at the factory?

One of our friends worked at Alcort in the 50s, first sanding the wood parts then promoted to cutting out masts and the like, He said one of the first things he did was send a mast blank through a planer with the template still attached, which sawed up the template. There were conversations afterwards, one way type.
These numbers? Does this mean that I’ve got kit number 14??? Because that would feel really neat. I’ve got the “patent pending” on the rudder attachment along with the elephant ear. Maybe? I take comfort in something you said over the phone…she’s now my boat, she just will have owners as well.
IMG_8670.jpeg
Zoom in to see they say 14 #5, #6, etc…
 

Attachments

  • IMG_8262.jpeg
    IMG_8262.jpeg
    1.3 MB · Views: 46
True, the 1950s bow handle is a favorite of ours also. The stem is the small chunk of wood at the bow where everything is screwed together, including longerons, planks and the hull and deck panels. Part #1 in the photo below.

IMG_6270.jpg


So for the audience, the numbering is 14 for the 14 footish "Sailfish 14" aka Super Sunfish 1. Frame #5 and I like how they stamped bow and deck on the frame. It did matter which way to orient the frame, as those had different bevels cut on the ends to best fit the plank.

We've only seen the tapered aluminum mast in photos, so we'd need to see close ups of yours. Is it solid or hollow? No idea what would cause the rings.

The mast on our 1953 Sunfish is hybrid, aluminum lower and wood tapered top. We've seen a few others the same way.

Now we think when you take Woody out for Sea Trials you should recreate this photo.

1957 Sunfish Ad.jpg
 
And yes, it is nice of other folks to store Skipper's boats all over the country for us, so she doesn't have to trailer a boat everywhere. We've restored or renewed about 60, ranging from 12 feet up to 22.

IMG_5787.jpeg
 
Don't do what I did when I restored a wooden Sunfish 40 odd years ago when I was in my teen's. I left it in my parents backyard under a tarp for a few years and it decomposed into nothing. The only items I have left are the spars. The mast was turned into a lamp post by my father.

It's last voyage was at Sebago Lake in Maine when we took it on a family camping trip. My father and I decided to test it's lake worthiness so we went out for an afternoon sail.

For some reason we couldn't tack to starboard and ended farther and farther from our launch point. A squall came through which flipped us over and we lost the rudder. I remember being so cold as we sat on the hull bottom waiting for rescue. Our quick test sail turning into a 5 hour ordeal. Luckily we had PFD's!

She's why I have two Sunfishes today. May she rest in peace....
 

Back
Top